(Quite) Robust Thresholding
Today, I’m detailing the method I’m using to threshold images for line detection. Also included are some hard-learned lessons about premature optimisation and the importance of re-evaluating your decisions frequently!
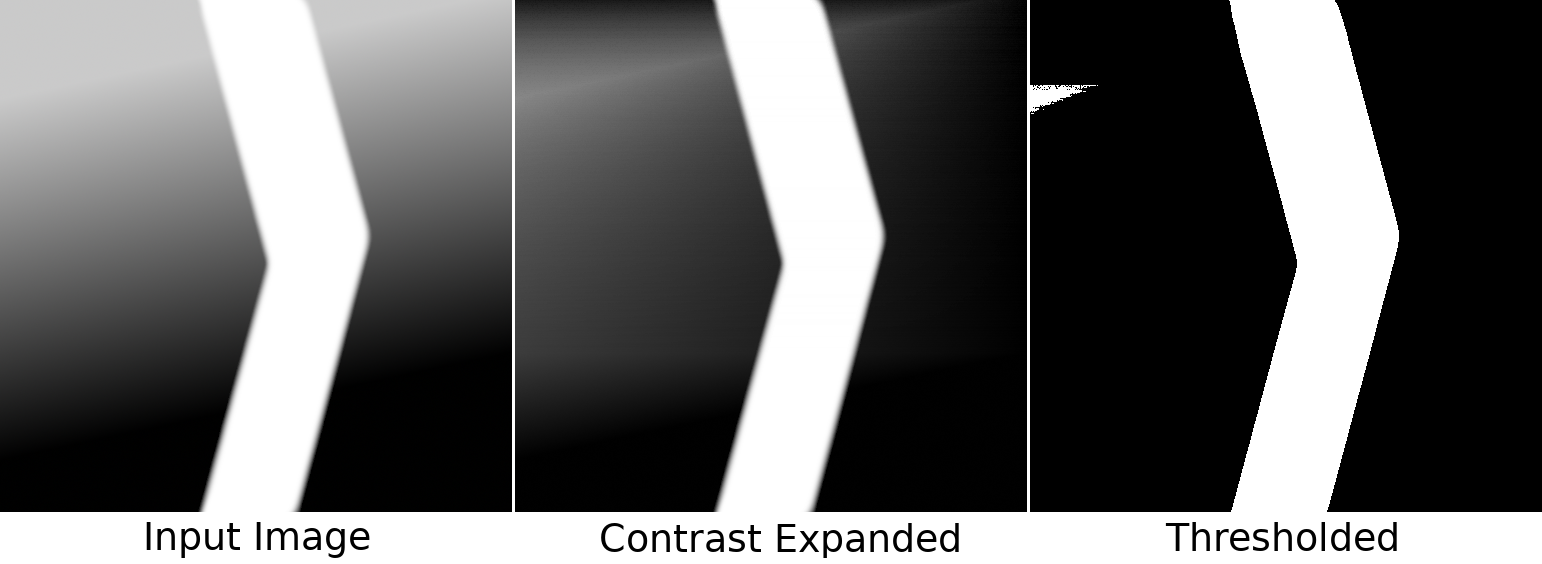
Image thresholding is the process of taking an image, and converting it into a two-color (just black and white, no grey) image. This is useful for lots of image processing algorithms - like edge or blob detection.
My initial focus here has been on implementing a white line detector for the “Blast Off” challenge.
For the purposes of this post, I’m only going to consider greyscale images, so every pixel is represented by a single 8-bit value between 0 (black) and 255 (white).
The simple way to threshold an image is to simply check each pixel against a value (the threshold). If the pixel’s value is lower than the threshold, make it black, and if it’s greater than the threshold, make it white.
The problem with this approach is that different regions of the image might have different levels of brightness, meaning that a single threshold value isn’t sufficient, and leading to features being lost in dark or bright areas of the image.

The approach I’m using is to first find the minimum and maximum value in each row of the image, and use those to scale the values in the row such that the darkest pixel becomes 0 and the brightest 255. After each row has been re-scaled, I can use a fixed threshold of 128, and differences in brightness are handled much better.
GPU “acceleration”
Now for the hard-learned lesson. In Bot Matrix, I made good use of the Pi’s GPU to do image processing to correct lens distortion and implement scaling and colour correction. Building on that experience, I was keen to implement my thresholding algorithm on the GPU.
The difficulty lies in the way that GPUs work. GPUs are designed for massively parallel computation. The expecation is that every pixel can be generated in isolation from all other pixels, and so all of them can be generated in parallel (as far as the number of threads in the hardware will allow).
This causes trouble for something like finding the minimum and maximum values in each row, because this means the output value depends on lots of input values (the values of all pixels in that row). While you can implement a “for” loop in a GPU program, that tends to be very inefficient, and performs badly.
The solution is to break the problem down into smaller pieces which can be calculated in parallel. In the case of finding per-row min and max, the idea is to find the minimum and maximum of pairs of pixels, and write those to an image which is half the size of the original. Repeat this process over and over, until we’re left with an image which is only 1 pixel wide, with values representing the minimum and maximum of each row:
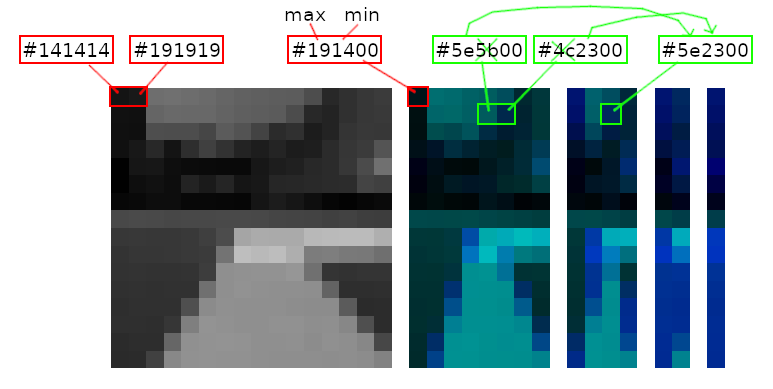
This means that each output pixel only needs to read the value of two input pixels, which is much easier for the GPU.
This process is made slightly more complex by the fact that OpenGL ES 2.0 (the version implemented by the Raspberry Pi) doesn’t let you read from and write to the same image. This means that two images are needed, with data ping-ponging between them. I call them the “odd” and “even” images, with ‘odd’ storing the outputs which are (1/2), (1/8), (1/32) … of the input image, and ‘even’ storing (1/4), (1/16), (1/64) …
Once the 1-pixel-wide result has been reached, it’s used to scale and threshold the input image in one final pass.
Performance
Having spent a considerable amount of time implementing the recursive GPU version of this algorithm, I wanted to benchmark it against the CPU version. I assumed that the GPU would be much faster than the puny ARM1176 in my Pi Zero.
For my application, I’m planning to use images which are only 16x16 pixels, as this is enough resolution for detecting a line.
So, with a straightforward CPU implementation, and my fancy GPU implementation in hand, I timed the runtime for my 16x16 image: The simple CPU version outperformed the complicated GPU approach by 1000x! That, to be honest, was quite upsetting.
The lesson here, is that while the throughput of the GPU may be theoretically much higher than the CPU, the overheads of setting up each job, and having it process such small tasks, means that its large parallel throughput can’t be effectively utilised.
When increasing the image size to 512x512, the GPU approach does outperform the CPU by somewhere between 2-7x, showing that for larger tasks, the GPU can do much better.
Needless to say, I’m going to focus much more on not using the GPU from now on!