Mini Mouse's Software
Before I dive in to details on individual challenge implementations, I thought it would be sensible to describe how the software on Mini Mouse sits together. Some of this information is duplicated in We’re in, but there’s more detail here, and things have evolved since then.
The diagrams on this page are created with graphviz
(or more correctly, dot), which doesn’t give the prettiest of drawings, but
does stop me wasting time obsessing over layout.
All of the software I’ve written for Mini Mouse is in either go (golang) or C. My day job has been C-based for the past 5 years, but in my spare time I use go wherever I can. It’s highly productive, and to me it feels “fun”; though I don’t think I can quantitatively describe why.
Overview
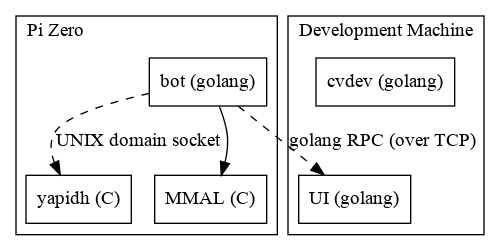
On the robot itself, there’s three key software components:
botis a single go binary handling all robot operationsyapidhis generating pulse-chains for the stepper motors, using the Pi’s DMA engine to give microsecond precisionMMALis Broadcom’s hardware abstraction library, which I use to access the camera
In addition to that, I have two tools which run on my desktop/laptop:
uidisplays real-time telemetry from the robotcvdevlets me develop my computer vision algorithms using captured still images
Pi Zero SW
Cue scary diagram:
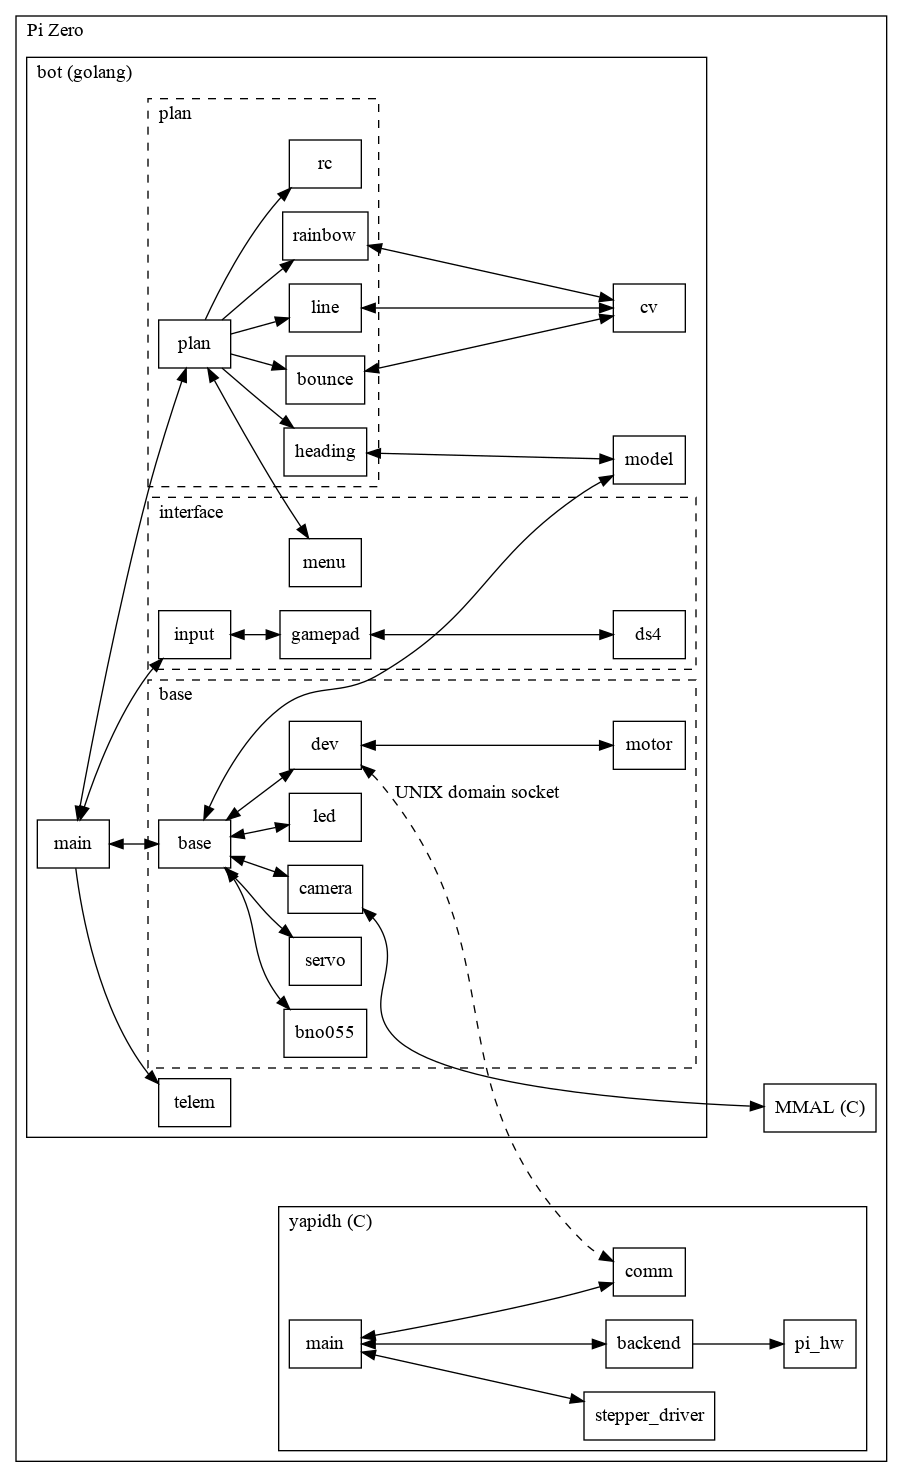
This diagram attempts to show the rough break-down of different software modules on the Pi. It will make much more sense after you’ve read the following few sections.
bot
The bot application is, at its core, a single loop. This loop runs at a
configurable rate (60 Hz), and in each iteration decides what the robot should
do.
This kind of fixed-rate loop is easy to get wrong. If you simply sleep for 1/60th of a second on each iteration, then you don’t account for how long your processing took. If you measure how long your processing time took, and sleep according to that, then you will slowly drift over time as the check/sleep introduces some delay.
golang’s standard library provides a really handy primitive for getting this
kind of fixed-rate behaviour reliably, called a time.Ticker:
package main

import (
	"fmt"
	"time"
)

func main() {
	// Create a new ticker which ticks at 1 Hz
	ticker := time.NewTicker(1 * time.Second)
	defer ticker.Stop()
	for {
		// This will block until each second passes
		<-ticker.C

		// This will run every second
		fmt.Println("Current time: ", time.Now())
	}
}
That forms the basis of bot’s main loop - inside the block called main in
the diagram above.
In each loop iteration, I split the work that needs to be done into three (approximate) phases:
- Sense - read the latest state from the controller and sensors and use that to update the robot’s internal state
- Plan - based on the current “task”, determine what action to take
- Act - execute whatever actions were decided on by Plan
This sequential approach keeps things relatively simple, and deterministic - rather than having a more asynchronous event-based system.
base
The base module represents the hardware of the robot. It provides access to
all the sensors and actuators on the ‘bot. There’s no real “intelligence” in
the base module - it’s purely a facilitator. base is relevant for the
Sense and Act phases.
The main component exposed from base is base.Platform, from which we can do
things like find out the maximum speed (platform.GetMaxVelocity()) or set
the robot moving (platform.SetArc(tangential, angular float32)).
Inside base, there’s drivers for talking to the BNO055 orientation sensor
(IMU) and external attachments over i2c, a module for communicating with the
yapidh motor driver application, and a module for accessing the camera.
interface
The interface module is concerned with user interaction. In here, we collect
input events from the controller (I’m using a DualShock 4 PS4 controller). It
also includes a general library for implementing menus using the LEDs on the
DS4.
interface is relevant for the Sense phase.
model
On Mini Mouse, the model module doesn’t do a lot. The intention is for the
model module to collect the sensor inputs (orientation, distance to
obstacles, wheel rotations) and use those to build a world-model.
On Bot Matrix (which used the same general architecture), the model was using
feedback from the encoders to try and determine a position and orientation of
the robot. However, dead-reckoning based on wheel rotations is highly
inaccurate - and so I dropped that in the Mini Mouse implementation.
Right now, all model does is grab the latest IMU reading from base and uses
that to provide orientation information to any other modules that want it.
plan
The plan module is the most complex and most important. Inside plan there
are a bunch of different “Tasks”, which represent a behaviour for the robot.
There’s a menu (from interface) which lets me select a Task via the
controller, and plan keeps track of which Task is active. Each time around the
main loop, the planner runs the currently active Task to determine what to
do.
“Running” the Task is simply a matter of calling its Tick() method, which is
expected to grab whatever information it wants from base, interface and
model, and decide what to do until the next iteration.
The simplest Task is rc (Remote Control) - on each invocation of Tick() it
gets the latest thumbstick position from interface, as well as button states
(for turbo boost/slow), calculates desired motor speeds, and tells base to
apply them.
Some of the more complicated tasks instantiate sub-tasks - for instance
bounce, which is the maze challenge’s Task, instantiates a heading Task,
which it uses to drive a bearing between turns.
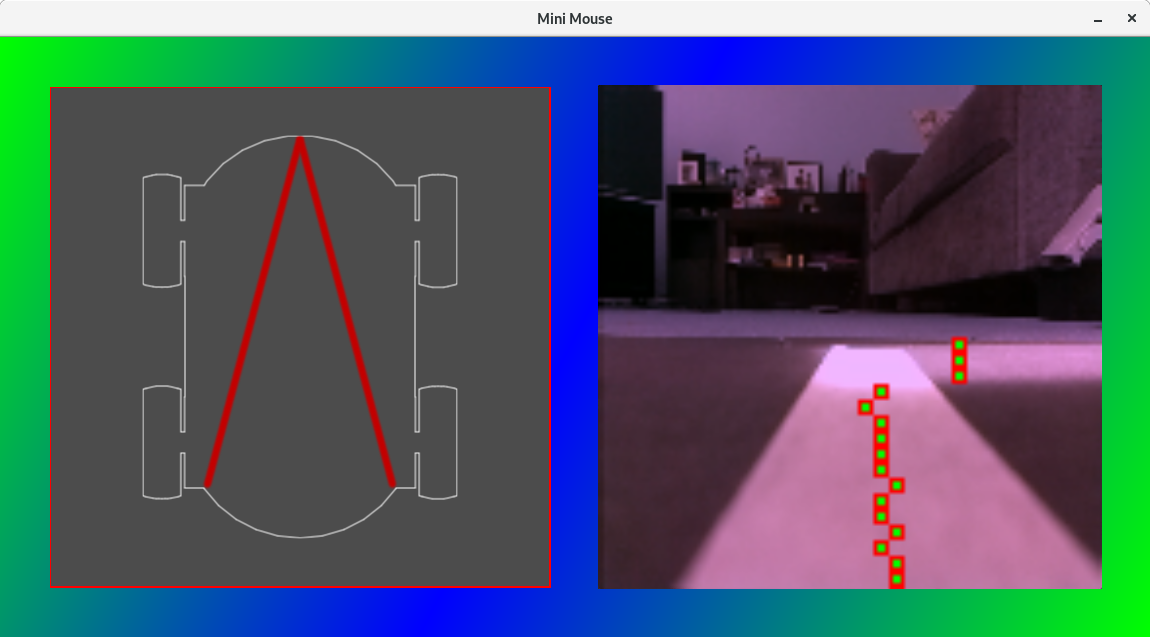
cv
cv is a basic computer vision library, consisting of just a few primitive
computer vision functions I implemented. There’s primitives such as calculating
the difference between pixels, and higher-level functions such as
FindHorizon().
This functionality is used by some Tasks to achieve their goals.
telem
telem is a bit of a hack, just shoved into the main source file. It
implements a bunch of telemetry functions which are exposed via go’s RPC
library. This allows the UI application
running on a different machine to query state from the robot (orientation,
camera frames, etc).
yapidh
yapidh (Yet Another Pi DMA Hack) was a bit of a gamble, which really paid
off. Being so tight on space inside Mini Mouse, I didn’t want to have a
microcontroller to run the motors. Unfortunately, having stepper motors means
that I need to be able to generate 4 sets of microsecond-perfect pulse chains
to step the motors.
I’ve done a somewhat more detailed write-up on it’s inner workings on hackaday.io.
yapidh uses the Pi’s DMA engine to generate accurately-timed GPIO outputs, in
a method similar to what pigpio and
ServoBlaster
do. Where yapidh differs is that it generates the DMA commands on the fly
rather than running a continuous loop.
Effectively, every 16 milliseconds or so, yapidh wakes up and decides what
pulses it needs for the next 16 milliseconds. It “generates” them all in one
go, creating a chain of commands for the DMA engine. Then, it joins that list
of commands onto the previous list (which should be currently running), and
goes back to sleep.
By generating these “chunks” of waveform, I can get away with jittery non-realitime Linux scheduling, whilst still getting guaranteed waveforms out of the GPIO.
In my experiments, even under heavy load, yapidh gets woken up in time to
generate and queue the waveform chunks reliably - and to make extra sure I run
the service with the highest priority possible, and SCHED_REALTIME.
yapidh receives commands from bot over a UNIX domain socket, supporting two
main commands:
- Set speed - move the given motor(s) at the given speed until told otherwise.
yapidhwill take care of calculating a proper acceleration profile to stop the steppers stalling. - Controlled move - move the given motor(s) an exact number of steps, with a
given maximum speed.
yapidhwill take care of the acceleration profile, modifying the maximum speed if there aren’t enough steps to accelerate to and decelerate from the commanded speed.
It also feeds back the number of steps applied to each motor (which tells bot
how far they’ve turned), and when controlled moves finish.
Development machine software
The other two tools are relatively basic.
ui
ui uses SDL and cairo to draw stuff, and queries telemetry data from the robot.
So far, I just display the robot’s orientation, and the most recent frame from
the camera.
Orientation is useful for debugging the autonomous algorithms, and the camera feed is good for driving remotely.
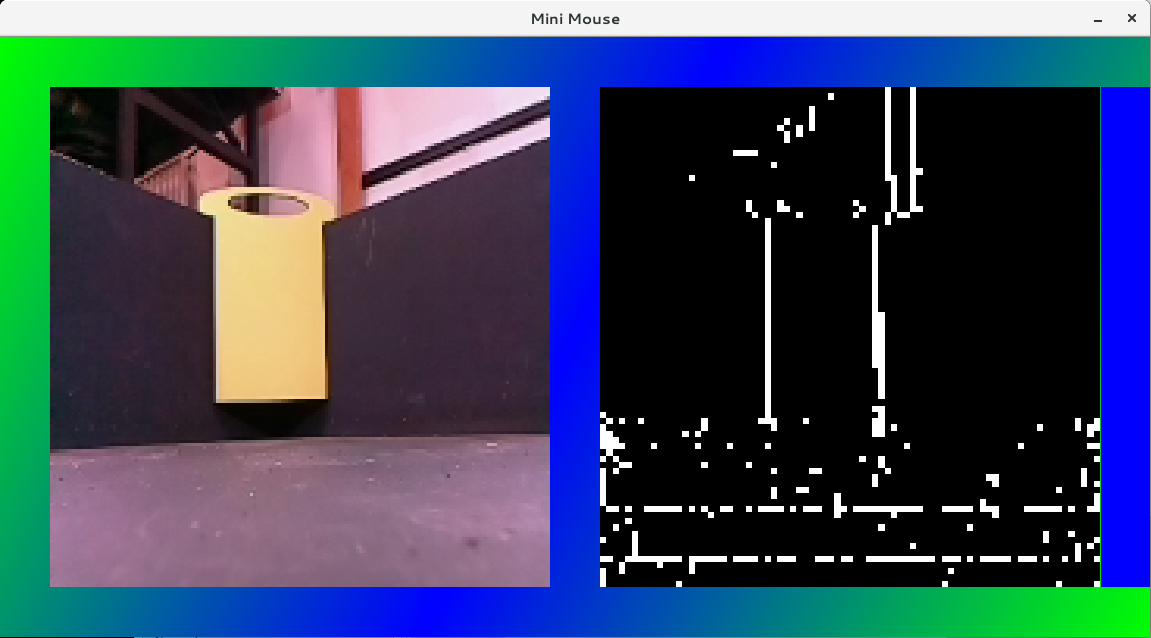
More seriously, I use the camera frames for testing cv in real-time. I can
grab the frame from the robot, and run the same algorithm that it would run.
This lets me more easily debug, view intermediate output, and develop the
algorithm without worrying about the Pi’s performance.
The other really useful thing ui can do, is dump the camera frame to a file,
which lets me take snapshots of interesting or troublesome frames for later
work in cvdev.
cvdev
cvdev is a copy/paste of the SDL/cairo code from ui, but it’s designed to
load in image files and run cv algorithms on them. I can use it to develop
the algorithms against static snapshots, and profile and optimise them.
If I dump the frames from ui, then they’re exactly the same as what comes
from the Pi camera, meaning I can be sure that the results will be the same when
I transfer the algorithm to the Pi.
cvdev has been invaluable for developing my autonomous code which uses the
camera, speeding up the process immeasurably.